How Can We Help?
Users & Roles
How to find the Organization’s User Settings:
- Click on the Organization tab, located in the main left menu..
- Select Users.
The users panel allows you to:
- add / import new users
- update the information of current Users
- delete users
- export user Information.
User Roles

By assigning different Roles to your Users, you can give them specific rights that determines what they are allowed do in Test Invite. This allows you to share the workload with your employees or colleagues, and keep all the information safe.
There are 7 roles that you can assign to a user:
- Regular User: Test-taker. Has access to the Exams that they have been invited to. Can login with their username and password.
- Manager: Has access to the Question Bank, Tests and Tasks. Can overlook over entire examination processes, but is not allowed to purchase credits or use the Organization Panel.
- Operator: Has access to the Task, can create Tickets, send Email invitations, check and export results, see video & photo recordings, among others.
- Editor: Has access to the Question Bank and Tests. Can create and edit new questions and exams.
- Question submitter: Can create new questions, but cannot add them to the Question Bank. In order for the questions to be added to the Question Bank, the question submitter should make an” Inclusion to the Question Bank” request, which will be approved by the Question Bank Supervisor.
- Question Bank Supervisor: Has access to the Question Bank, can add new questions or edit existing ones. The Question Bank supervisor evaluates “Inclusion to the Question Bank” requests ; they can approve or reject the inclusion of the questions to the question bank or request to be revised. Approved questions are added to the Question Bank.
Giving Restricted Permissions to the User: Special Role
With the SPECIAL role, a user can have limited permissions over your tasks. When you give permission, you specify “which tabs the user can access” in the Task Editor and “what actions they have permission to perform” in those tabs.
The permissions and related tabs that the user can access in the Task Editor are as follows:
| Permission’s Name | Tabs That the User Can Access in the Task Editor |
| Edit | Task and Access Tabs |
| Operation | Tickets, E-mails and Rooms tabs |
| Results | Results Tab |
| Live | Live Tab |
As you would be able to specify which tabs a user could access in this way, you should also authorize the user for a number of actions on those tabs:
| Action Name | What Can It Do? |
| Questions & Answers | User can access exam’ questions and answers |
| Export | User can export exam results |
| Re-setup | User can re-setup an exam |
| Evaluation | User can evaluate the answers (for input questions) given in the exam |
| Monitoring | User can access monitoring materials: photos, videos, screen recording, etc. |
Important:
- If you want to allow the user to export exam’ questions and answers, you must authorize the user for both “Question & Answers” and “Export” actions.
- If you give the user access to the Results tab as well as to the Operation tab, the user is allowed to use all features in the Results tab except the “Export” action.
- If you grant the user access to the Operation tab along with the Results tab, and select ”Export” action for the user, the user would be authorized to use all the features on the Results tab.
Restricted Permission For All Tasks
If you want the user to have limited access to all tasks, you can use the “Allow access to all tasks” feature.
To do this, check “Allow access to all tasks” and set the user’s privileges.

Granting restricted authorization to the user in the special role for all tasks.
Restricted Permission For a Task
If you want a user to have limited access for a task, you can use the “Permission for a specific task” feature.
To do this, enter the related Task ID and specify the user’s privileges.

Authorizing the user in the special role for a specific task
Info:
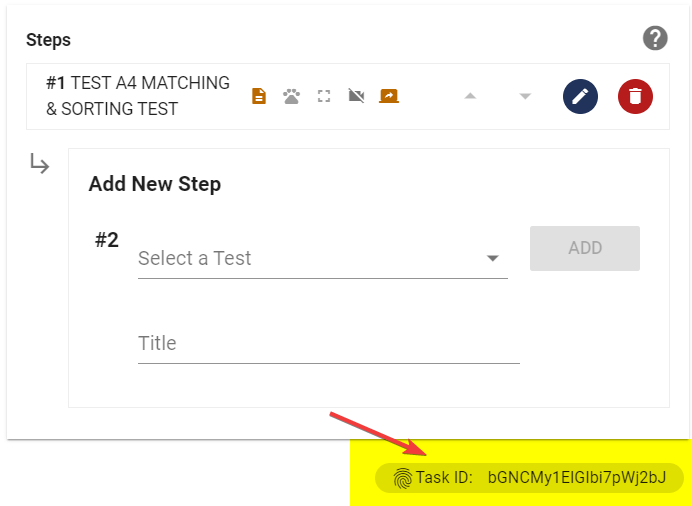
You can find the Task ID in the 1st tab of the Task editor, in the bottom right corner.

Note:
You can assign multiple roles to each Organization user. Each role gives different privileges to the respective user.
User Folder
You can classify users by placing them in specific Folders so that you can reach the users you want more easily. Each user created within the organization, is placed in a single Folder. If you do not specify a Folder when creating a user, the system places the created user in the “general” Folder by default.

For example, you can place the test-takers and administrators in different folders.

You can type any Folder name in dropdown box.
- If you have previously created a Folder, these will be listed in the dropdown menu, and you can add users to any of these existing folders.
- If you type a new Folder Name, the system automatically creates the new folder when you save the user.
Warning:
A user cannot be placed under multiple Folders. It can only be placed under one single Folder.
User Tags
User Tags are used to systematically group specific users within a folder. By grouping the users listed under a folder, you can find specific users instantly and manage them. These tags do not give any privileges to these users.

There are two main characteristics that differentiate a tag from a folder:
- A user can be under a single folder, but can have multiple tags.
- The folder only has a name, while the tag has both a name and a value.
WARNING
To add a Tag to a User, you need to click on the ADD button after typing the values for Tag Name and Tag Value fields.
EXAMPLE:
For a user who is working in Accounting, you can assign Tag Name as Department and Tag Value as Accounting.
This way, you will define this User’s department as accounting to the system.
After doing this, when you type accounting on the search field in Users List, the list will be filtered to show only the users with this tag.
Active Status
You can set Active (or Passive) status to any User in your Organization.
A User can only login to Test Invite if the User Account is set as Active.
Login
Users under your Organization can login by using your Organization’s Unique Web Address.
NOTE
Your Organization’s Unique Web Address can be setup from the Organization Setting Page.
WARNING
In order to have Unique Web Address for you Organization, you need to define a Unique Name in Organization Settings Page.
